Customer Payments: Non-Authenticated Payment
-
Non-Authenticated Payment
Only the users who have been assigned the permissions to search payments will utilize this feature and follow these steps.
-
Create a Non-Authenticated Payment
- Go to Customer Payments menu and select Search Payments
-
Fill in the fields as needed
-
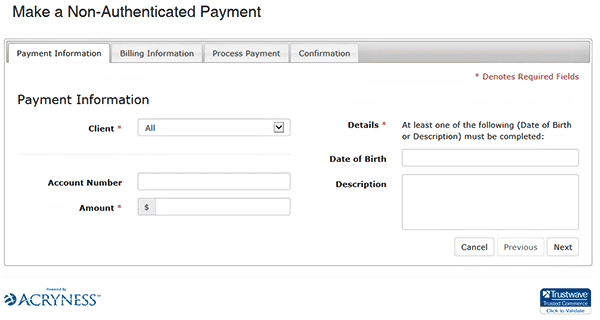
Payment Information
- Fill in the required information marked with an red asterisk (*)
- Client name in the dropdown box should be your organization
-
The account number is not a required field, but if you have one available this is the best identifying information for the account posting record
-
Details: You must provide at least one of the two options: DOB or Description
The account description field is used to list the account number(s) if this is an insurance payment in order for account posting to be accurate. If you do not know the account number(s), use this field to describe the department or the service provided that the payment is being posted for with reference to the customer’s name.
-
Billing Information
- Fill in the required information shown with an asterisk (*)
-
Enter the name according to the information this is on the credit card being used for payment
- If you are posting a guarantor, insurance company, or any type of bulk payment, use the insurance company name and split it between first and last name fields
- Enter Patient Phone number and capture patient email address
- Confirm and enter the Billing Address if different from Mailing
Mailing Address & Billing Address can be populated with the same information by selecting the feature
- Process Payment
- Fill in the required information shown with an asterisk (*)
- All Credit Card information is required
-
Confirmation
-
Validate all information entered on previous screens is correct
-
Select Agree to the Payment Policy
-
Select Submit Payment
-
Payment Receipt
- You can select view receipt and view the receipt in a printer friendly version (PDF)